This guide covers the process of setting up and configuring an Azure Migrate appliance with the purpose of assessing a Hyper-V Cluster. The purpose of this assessment will be to identify VM’s that are candidates for migration to Azure.
This article will concentrate on a simple assessment of a single Hyper-V server running a few Virtual Machines:

Create your Azure Migrate Resource
The first step is to login to the Azure Portal and search for Azure Migrate using the top search bar:

From here, click ‘Discover, assess and migrate’ under the Servers, databases and web apps section:

Next, click ‘Create Project’:

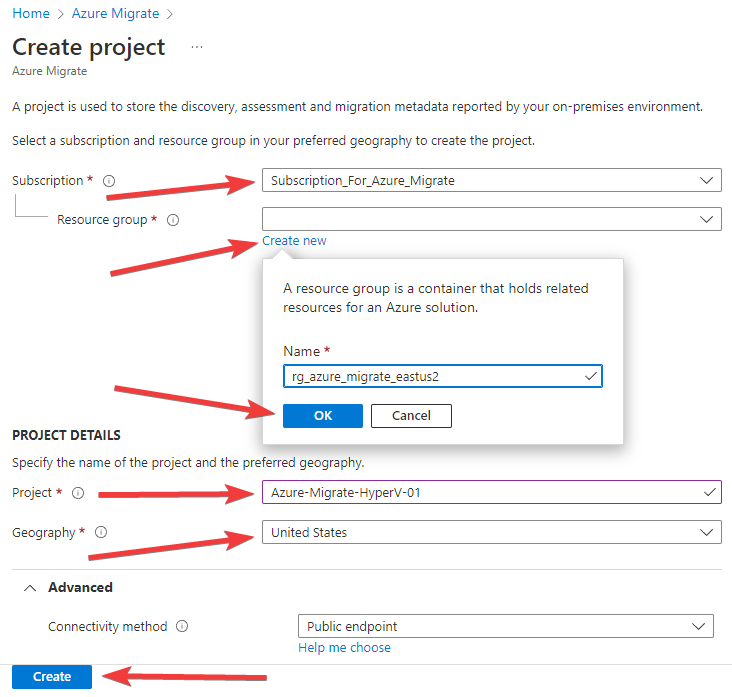
At this point, a few details are needed to create the new Azure Migrate project. Select your desired subscription, and either create a new resource group for your Azure Migrate metadata, or select an existing resource group. Give the project a name and choose your geographical location, then click Create.
Set up the Migrate Appliance and Discover Services
Once your Azure Migrate project is successfully created, click the Servers, databases and web apps button on the left-hand side menu, then click Discover under the Assessment Tools section:

Appliance Configuration & Download:
First, in answer to the question ‘Are your servers virtualized?’ Select ‘Yes, with Hyper-V’,note

Step 1: Generate your project key:
For step 1, Fill in the Name your appliance field and click Generate to generate a connection key.
Step 2: Download your virtual appliance VHD file (or OVD for VMware):
While your key is generating, make sure you have the VHD radio button selected, and click Download.

The VHD file is fairly large and can take several minutes to download:

Step 3: Copy your project Key
Once your key finishes generating, ensure it is copied to a secure location/vault:

Setup VHD in Hyper-V
After the VHD download completes, extract the zip file, then create a new VM within Hyper-V that meets the minimum specifications of 16GB RAM and 8 vCPU’s and around 80GB of disk space.
Start by extracting the folder to a location where Hyper-V Images are typically stored:

Within Hyper-V, create a New VM and click Next.

Specify a VM Name select the Virtual Machines folder from within the AzureMigrateAppliance directory that was extracted in the previous step, then click Next.

Select the Generation 2 radio button and click Next.

In order to meet the minimum VM specification requirements, set the Startup memory to at least 16384 and uncheck the Use Dynamic Memory checkbox before clicking Next.

Ensure that the most appropriate Hyper-V Networking connection for your environment is selected, then click Next.

On the Connect Virtual Hard Disk screen, choose the Use an existing virtual hard disk radio button and click Browse. Navigate to the Virtual Hard Disks folder from the location you extracted the VHD to and select the 14393.0.amd64fre.rs1_release.160715-1616_server_serverdatacentereval_en-us.vhd (or similarly-named VHD file, there should only be one in the Virtual Hard Disks directory), then click Next.

Verify your selections on the final screen before clicking Finish.

Once created, open the properties for the new VM and increase the processor count to 8 to meet the minimum requirements, then start the VM.

Configuring our Appliance
Once the machine is running, connect via the Hyper-V Console:

Accept the License Terms:

Create an Administrator Password and click on Finish:

Log on with the password created in the previous step:

This is a standard Windows Server and Appliance configuration page should fire up immediately upon login:

Click ‘I Agree‘
Provided that the VM was configured with internet access, it will run some prerequisite checks and install any updates it needs, just select Refresh if you see this screen:

Ensure all the prerequisite complete with Green ticks before proceeding:

Scroll down to 2: Register with Azure Migrate and enter the Azure Migrate Project Key that was generated in the Azure portal earlier in this tutorial.

After pasting your Project Key and clicking Login, it presents you with a Device code. Click the Copy code & login button.

A browser will open to an Enter code prompt. Paste the code and click Next.

Click Next, then proceed to login with your Azure AD admin account relevant to your Tenant and Azure subscription that you setup the Azure Migrate project with earlier in this tutorial:

Enter your password then click Sign in:

After you successfully sign in, you should see the following message. Close the window and wait for the appliance to finish the registration process.


You will eventually see a registration successful message:

Step 3: Hyper-V Credentials
After successfully completing the login process in step 2, scroll to step 3 and click Add credentials:

Input your Hyper-V credentials and click Save.

Scroll to Step 2: Provide Hyper-V host/cluster details and click Add discovery source

Enter the IP or DNS name of your Hyper-V Host/Cluster and click Save.

It will begin validating the credentials and Hyper-V connection information you provided.

Within a few moments, a Validation successful message will appear:

The final action for this section is to click the ‘Start Discovery’ button:


Azure Assessment
You can watch the discovery process from the Azure Migrate portal:

Once the discovery process is complete. Click the Assess dropdown, then click Azure VM:

Give the Assessment a Name and edit any of the Assessment properties as needed:


Make any necessary changes, then click Next

Select the servers you want to assess, then click Next

Review the assessment details, then click Create Assessment.

If we now browse back to our ‘Overview’ section we can see that our assessment has been created:

Click on Assessments

From the Assessments overview screen, click on your assessment name to open the details page:


The details of the assessment help you determine your initial migration readiness. In this example, one VM can be migrated without changes, while 5 require you to select VM settings before migration can begin:

We can also see that Azure Migrate has given an Azure VM Size based on the size of the VM in the original Hyper-V setup. For additional report details, it is recommended to install the agent on each VM to glean a dependency report which would show if there are any multi-tier applications, their communication protocols, service health, etc. This data will be beneficial when actually performing the migration and cut-over.
Summary
This completes the detailed tutorial on setting up and configuring Azure Migrate to assess a Hyper-V environment. Remember that the process is similar for VMWare as well as for physical servers.

Comments