Recently I was asked to add a recurring reminder to every mailbox calendar in an Office 365 tenant. While this seems like it should be a fairly straight-forward task, it turns out there is a bit more to it than just adding an event via the O365 admin center.
Click here to collapse the background section and skip straight to the instructions.
Background
A bit of research uncovered this custom PowerShell module on TechNet that uses the EWS Managed API to create calendar appointments inside user calendars for O365:
https://gallery.technet.microsoft.com/Create-Appointments-for-779b55ad
Quite a bit of trial and error with the functions I’ve already written for Exchange Online PowerShell revealed that the script above was running a name-resolution check for every user I was piping through to it, which was causing errors. – I dug into the script and found that the element it needed for the calendar creation was the PrimarySMTPAddress attribute. Since I was already running a command against the mailboxes, I just selected that attribute and modified the New-OSCEXOAppointment script above to just use the attribute passed rather than trying to do a lookup for each run.
I saved the modified script which can be downloaded via the instructions below.
The instructions utilize the Connect-EXOnline powershell function which can be installed via the instructions below as well. For more information on the Connect-EXOnline functions, see the article on Connect-EXOnline.
Instructions:
1. Download and install the Exchange Web Service Managed API 2.0:
http://www.microsoft.com/en-us/download/details.aspx?id=35371
2. Download the modified version of the NewOSCEXOAppointment Powershell Script from the link below:
3. Extract the ZIP file to C:\temp\
4. Open Powershell (NOT as admin) and change directory to C:\temp
5. Run the AddEXOnlineProfileFunctions.ps1 file by typing:
.\AddEXOnlineProfileFunctions.ps1
- It should display a result message in green text letting you know it was successful.

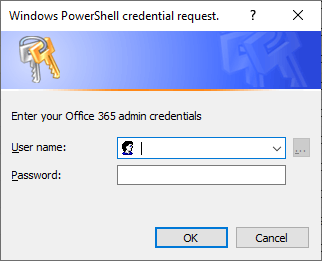
6. Connect to Exchange Online PowerShell by typing:
Connect-EXOnline
- It will bring up a login window. Enter the O365 global admin credentials for the tenant you want to perform this script on.
7. After it loads, enter the following command:
Import-Module .\NewOSCEXOAppointment-RequiresMailboxPrimarySMTPAddressParamater.psm1
8. Connect to the Exchange WebServices Shell by typing:
Connect-OSCEXOWebService
- It will bring up a login window. Enter the O365 global admin credentials for the tenant you want to perform this script on.
- These are the same credentials you ran for the last login box.
9. After it loads and brings you back to the prompt, enter the following command to give Global Admins the necessary permissions to add calendar events to all user calendars:
Get-Mailbox -ResultSize unlimited -Filter {RecipientTypeDetails -eq 'UserMailbox'} | Add-MailboxPermission -User "Organization Management" -AccessRights fullaccess -InheritanceType all -AutoMapping $False
- This will take some time, but wait until it completes.
For this next part, it is advisable to wait at least 1-2 hours for the “Add-MailboxPermission” command to fully propagate. If you don’t and you run into permissions errors, there is no easy way to filter out which mailboxes already successfully received the new calendar event and which did not. Wait the appropriate time and then proceed to step 10.
10. Run the following command to allow you to see which mailboxes successfully get the calendar event:
$VerbosePreference = "Continue"
- There is no confirmation, but you can test by typing
$VerbosePreferenceand making sure it shows “Continue”.
10. Run the command below & watch it create the event in every user calendar:
Get-Mailbox -ResultSize unlimited -Filter {RecipientTypeDetails -eq 'UserMailbox'} | Select-Object Identity,Name,PrimarySmtpAddress | %{New-OSCEXOAppointment -DayOfTheWeek Tuesday -DayOfTheWeekIndex 3 -Identity $_.PrimarySMTPAddress -Interval 1 -Subject "Mandatory Appointment Subject" -Body "Optional Appointment Body" -Location "Optional Location" -UseImpersonation}
- The process is complete and the calendar event exists as a recurring event on the third Tuesday of every month for each user.
Notes:
You can read more on the TechNet site for New-OSCEXOAppointment on how to get the specific command you need, but it is recommended that you use the following command to bring up the graphical code generator for the command as seen below: Show-Command New-OSCEXOAppointment

It is INCREDIBLY imperative, though, that when you use this code to generate your specific calendar event creation code, that you use $_.PrimarySMTPAddress in the Identity field, otherwise the code in step 11 will fail.
In case it’s helpful, I’ve included a version of the code in step 11 that you can use to paste in your version of the New-OSCEXOAppointment code. Just replace the %REPLACEME% section with your code:
Get-Mailbox -ResultSize unlimited -Filter {RecipientTypeDetails -eq 'UserMailbox'} | Select-Object Identity,Name,PrimarySmtpAddress | %{ %REPLACEME }

Comments